

The lighting circuit is fed by a fuse labeled "Headlight fuse" as shown in the snip from the Rhino Owners Manual below.Originally Posted by publicsafety418

That fuse powers the Head-lights and Tail-lights. There is also a double throw relay involved in the circuitry which is involved in switching between high and low beams. I'll try to put together a snip of the wiring diagram tomorrow which I will annotate as to what to look for. To make sure that the power is not supplied to the headlight circuit, on the chance that the short resides there, pull that fuse out of the fuse block.
You could consider using a simple SPST key switch to replace the stock ignition key switch, while using a separate momentary pushbutton switch to engage the starter motor relay. You can find these key switches at electronics supply houses and even at a decent hardware store such as Ace hardware. I imagine it would be a whole lot cheaper than the stock ignition switch from Yamaha.
It looks like you are closing in on the problem !!!

|
Sponsored By: |
|
 Thanks: 0
 Likes: 4
Results 21 to 25 of 25
-
12-03-2016, 09:07 PM #21Most Senior member

- Join Date
- Dec 2013
- Location
- Portland, OR
- Posts
- 1,636
Last edited by SteveS; 12-03-2016 at 09:10 PM. Reason: added diagram
____________________________________
...... 2004 660 Camo, "Rhino". And now, also a Wolverine X4. "Wolfy".
|___________________________________
| Two roads diverged in a wood,
| I took the one less traveled by....
| Oh, Oh .
| .............
| ...............
| ............... #
|___________________________________
-
12-04-2016, 12:09 PM #22Most Senior member
- Join Date
- Dec 2013
- Location
- Portland, OR
- Posts
- 1,636
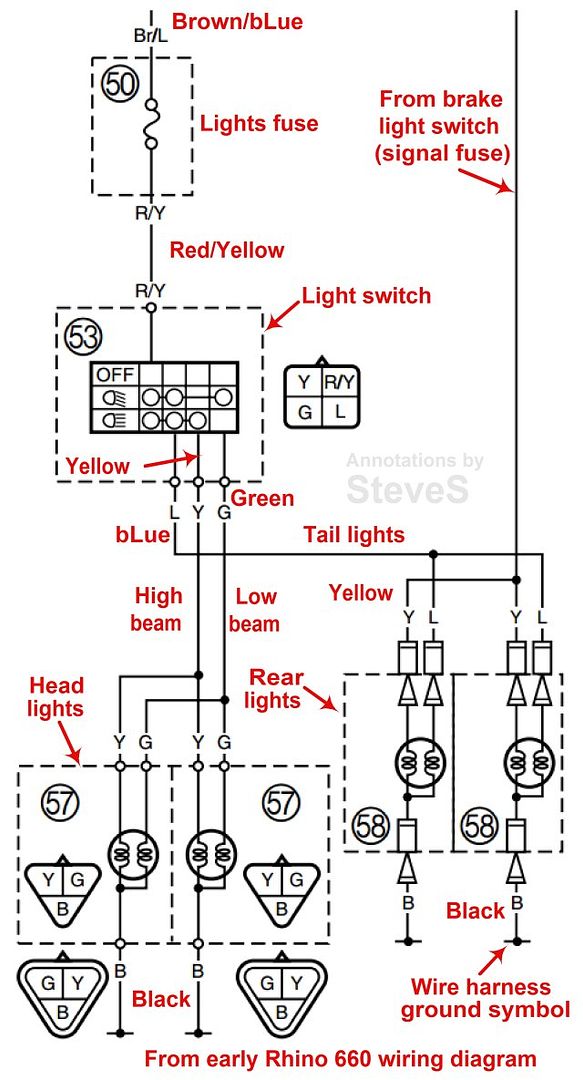
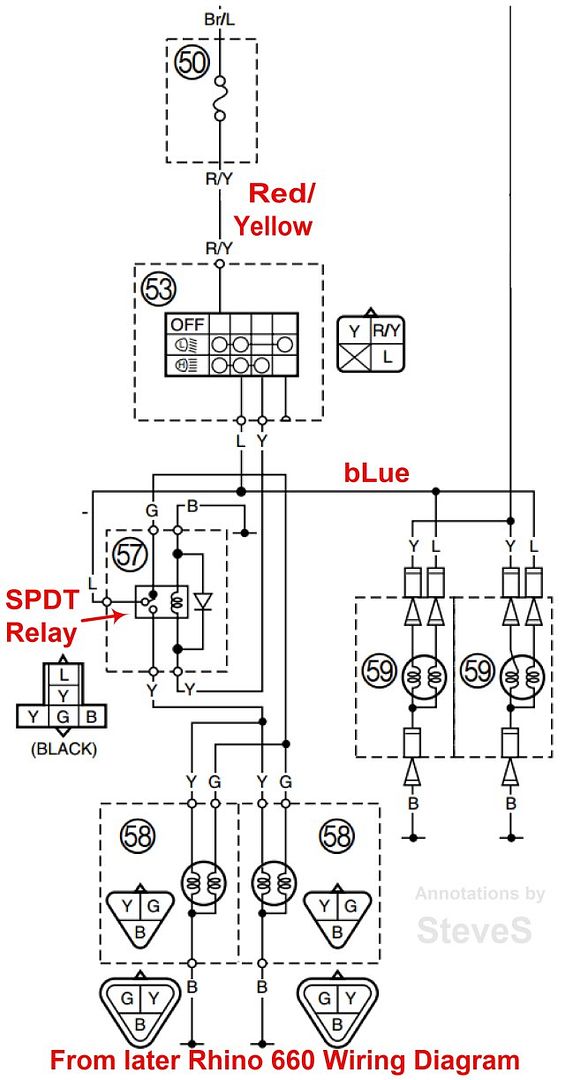
Here are the annotated wiring diagrams for both the early (likely 2004 to 2005) and later models of the Rhino 660. The difference is an added relay and some associated wire color changes for the later models. I hope this is of some help for you.
BTW, The replacement switch for the "run" switch should be rated at for at least 20 Amps. Better would be 30 Amps to insure that it will not fail if you should have a short circuit down stream (it is protected only by the mains fuse). However, 30 Amp rating switches are hard to find. Ideally, you could use just about any small rating switch if you put a relay in to actually power the machine. These are very commonly rated at 40 Amps and quite inexpensive. You would be looking for a 4 terminal 12 Volt automotive relay, which can be found at any auto parts store.
Early Rhino 660 Lighting circuit
Later Rhino 660 Lighting circuit
Last edited by SteveS; 12-04-2016 at 12:22 PM. Reason: added BTW comment
____________________________________
|___________________________________
| Two roads diverged in a wood,
| I took the one less traveled by....
| Oh, Oh .
| .............
| ...............
| ............... #
|___________________________________
-
12-07-2016, 05:45 PM #23
- Join Date
- Nov 2016
- Location
- Salvisa Ky
- Posts
- 12
Thanks for all the help again. I found the short. It was at the taillights where the taillight wiring splits and goes to each side. The blue wire which is Hot and the Black wire were bald and touching. It does not look like it was ever messed with so I'm not sure how it happened but I got it cleaned up and taped really good. I m guessing it caused the taillight bulbs to blow because I have power but the lights won't come on. The headlights work great now and are as brighter than ever. Once again thanks for the help.
-
12-07-2016, 06:07 PM #24Most Senior member
- Join Date
- Dec 2013
- Location
- Portland, OR
- Posts
- 1,636
That sounds good, other than your suspicion that the bulbs are blown. I would be suspect of both sides having failed due to both bulbs themselves burning out. The short in the wiring could have fried the wires upstream (either of the ground wire or the +12V wires, or possibly both). Check the voltage between bLue and Black wires at the connector at the rear end, with ignition switch on and the headlight switch on. If you have voltage at the connector, check the wiring going to the taillights themselves, as well as inspecting the bulb filaments. Originally Posted by publicsafety418
____________________________________
|___________________________________
| Two roads diverged in a wood,
| I took the one less traveled by....
| Oh, Oh .
| .............
| ...............
| ............... #
|___________________________________
-
12-07-2016, 06:19 PM #25
- Join Date
- Dec 2013
- Location
- Nashville
- Posts
- 976
Thanx SteveS that is what I will do with that old lawn mower light bulb in the cabinet incase I ever need it.
I thought that I would add a general comment of what I have found in the past on auto work when I had a short situation. The first thing to do is to do a visual on all wires and the harness of all places where it crosses hard corners, moving parts and hot places. That is the best likelihood where you may find a broken wire insulation which can lead to the short. Wire harnesses that look like they have been moved and not replaced with proper ties and tape are high risk areas if you inherited the bike from someone else. Lack of single wire protection from the mentioned zones, especially heat can create a short vinyl insulation life. Sometimes you can find these conditions visually quicker than electrically.2016 Wolverine R-Spec EPS, Camo, fender ext. 4000 Moto winch w/syn rope, 14"Method B-locks, 27" Maxxis Vipr 9 & 11's, Full flip windshield, A-arm guards, 2 batts, JBS CVT grind, 16 OD, slugs, purple, JBS/Eibach springs, Autometer Temp Gauge
08 Rhino 700 SE Black Armor, JBS 734 (bbk w/Carillo crank & rod, CP 11:1, deshrouded valves, Raptor springs, Viking cam & FI, MSD, afr Gauge, Unleashed sheave w/JBS OD 18g greased, Purple, slugs, 27" Mudlite XTRs , 6" Chopped , Mishi Rad, ALBA exhaust
-
Post Thanks / Like - 0 Thanks, 1 Likes
 SteveS liked this post

 Reply With Quote

Bookmarks